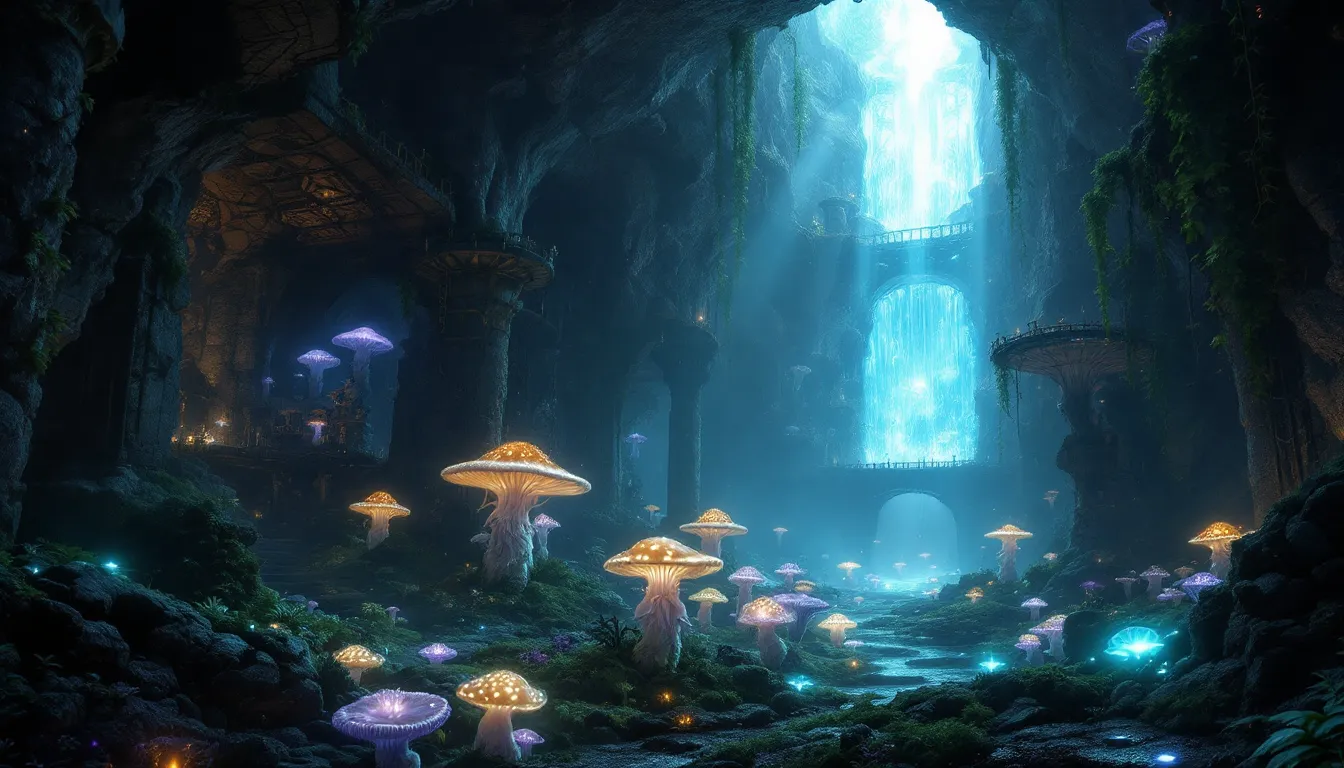
The first time you stumble into Blackreach, it’s impossible not to stop and stare. After crawling through cramped Dwemer ruins crawling with Falmer, the underground cavern suddenly opens up into a sprawling bioluminescent city that shouldn’t exist. Glowing mushrooms tower overhead, ancient Dwemer architecture sprawls across the cavern floor, and somewhere in the distance, a dragon waits to be awakened. It’s one of Skyrim’s most jaw-dropping hidden areas, and one of the easiest to miss if you’re not paying attention.
Blackreach isn’t just eye candy. It’s a massive, explorable zone packed with unique loot, dangerous enemies, and secrets that most players never discover. Whether you’re hunting crimson nirnroot, farming Dwemer scrap, or just trying to figure out how to get out, this guide covers everything you need to know about Skyrim’s most infamous underground wonder.
Table of Contents
ToggleKey Takeaways
- Blackreach Skyrim is an enormous underground cavern with unique bioluminescent environments, accessible through three main Dwemer ruins (Alftand, Mzinchaleft, and Raldbthar) during or after the main questline.
- The zone contains exclusive loot including 44 Crimson Nirnroot plants, Dwemer scrap metal for Smithing, and the chance to encounter Vulthuryol, a hidden secret dragon found nowhere else in the game.
- Bring frost resistance, lockpicks, and a minimum level of 15 to handle Falmer enemies and Dwemer automatons, with shock spells and stealth archery being the most effective combat strategies.
- Unlock the Great Lifts upon first entry to enable fast travel points for future Blackreach visits, saving time on re-clearing the connected ruins.
- Collect all 30 Crimson Nirnroot to complete the ‘Return to Your Roots’ quest and earn Sinderion’s Serendipity, a permanent 25% chance to duplicate alchemy potions.
What Is Blackreach and Why Should You Explore It?
Blackreach is a colossal subterranean cavern hidden beneath Skyrim’s surface, accessible only through specific Dwemer ruins. It’s technically part of the game’s main questline, you’ll pass through it during “Elder Knowledge” while hunting for an Elder Scroll, but the main quest barely scratches the surface of what’s down there.
The zone itself is enormous. We’re talking multiple farms, Dwemer towers, Falmer camps, and enough verticality to make navigation a genuine challenge. The entire area is lit by massive glowing mushrooms and Dwemer machinery, giving it an otherworldly atmosphere that’s unlike anything else in the game.
Why bother exploring beyond the main quest? Three reasons. First, Blackreach contains unique items and resources you can’t find anywhere else, including a full set of crimson nirnroot needed for a lucrative alchemy quest. Second, it’s home to Vulthuryol, a secret dragon that 90% of players never encounter. Third, if you’re into Dwemer lore or just farming high-value scrap metal, this place is a goldmine, literally and figuratively.
The zone spans three holds (Winterhold, Eastmarch, and The Pale), making it one of the largest single areas in the game. It’s also entirely optional, which means most casual players breeze through during the main quest and never come back. That’s a mistake.
How to Find and Access Blackreach
The Three Main Entry Points Explained
You can’t just walk into Blackreach. There are three main entrances, each requiring you to navigate through a full Dwemer ruin first:
Alftand (northwest of Winterhold): This is the most common entry point and the one the main quest sends you through. The ruin is large, crawling with Falmer and Dwemer automatons, and takes a solid 20-30 minutes to clear if you’re thorough. At the bottom, you’ll use the Attunement Sphere (obtained during “Discerning the Transmundane”) to unlock the entrance.
Mzinchaleft (southwest of Dawnstar): A smaller ruin that eventually connects to Blackreach’s western side. You’ll still need the Attunement Sphere to access the final chamber, but this route is faster if you’re coming from the western holds.
Raldbthar (west-southwest of Windhelm): This entrance dumps you into Blackreach’s eastern section. The ruin itself is relatively straightforward, but you’ll face multiple Dwemer Centurions, so come prepared.
All three ruins connect to the same massive Blackreach cavern. Once you’re inside and have unlocked the Great Lift at any of these locations, you can use them as fast travel points to enter and exit without re-clearing the ruins.
Requirements Before Entering
Technically, you only need the Attunement Sphere to unlock the Blackreach gates. You get this by starting “Discerning the Transmundane,” which Septimus Signus gives you at his outpost north of Winterhold.
But here’s what you should actually bring:
- Level 15 minimum: Falmer and Dwemer Spheres hit hard. You can survive at lower levels, but it’s a slog.
- Frost resistance: Chaurus spit frost damage like it’s going out of style.
- Soul gems: Dwemer automatons drop solid loot, and you’ll want to recharge your enchanted gear.
- Lockpicks: Several doors and chests require Adept to Master-level lockpicking.
- Empty carry weight: Dwemer scrap is valuable but heavy. Plan accordingly.
If you’re following the main quest, you’ll hit Blackreach naturally during “Elder Knowledge.” But if you’re exploring independently, make sure you’ve at least started Septimus’s quest to get the sphere.
Navigating the Massive Underground City
Key Landmarks and Points of Interest
Blackreach is disorienting. The cavern is so large and vertically complex that even veteran players get lost. Here are the major landmarks to orient yourself:
Tower of Mzark: The tall, central Dwemer tower where you access the Elder Scroll during the main quest. It’s the most visually distinctive structure and makes a solid navigation reference point.
Silent City: A cluster of Dwemer ruins on the eastern side, home to heavy Falmer presence and a unique quest item.
Farm Overseer’s House: A small Dwemer building with alchemy ingredients and the remnants of Dwemer agricultural experiments. Creepy and worth looting.
The Great Lifts: Three massive elevators that connect Blackreach to the surface at Alftand, Mzinchaleft, and Raldbthar. Once activated, these become fast travel points.
War Quarters: A large Falmer camp in the southern section. Expect heavy resistance but solid loot drops.
The glowing mushrooms are everywhere, but don’t dismiss them as scenery. They provide just enough light to navigate by, and their distribution can help you track which sections you’ve already explored.
Understanding the Layout and Zones
Blackreach isn’t a linear dungeon, it’s an open underground zone. Think of it as three rough sections:
Western zone (Mzinchaleft side): Lighter Falmer presence, more Dwemer automatons. Good for farming scrap metal and gears.
Central zone (around Tower of Mzark): The most open and scenic area. Fewer concentrated enemy camps, but scattered encounters. This is where you’ll find Vulthuryol’s summoning spot.
Eastern zone (Raldbthar side): Heaviest Falmer concentration, including the Silent City. More dangerous but better loot drops.
The cavern has multiple vertical layers. Dwemer bridges, platforms, and towers connect different elevations, and many areas require you to climb or drop down to access. There’s no mini-map marker spam here, you navigate by sight and memory, which is refreshing but also easy to screw up if you’re not paying attention.
Enemies and Combat Encounters in Blackreach
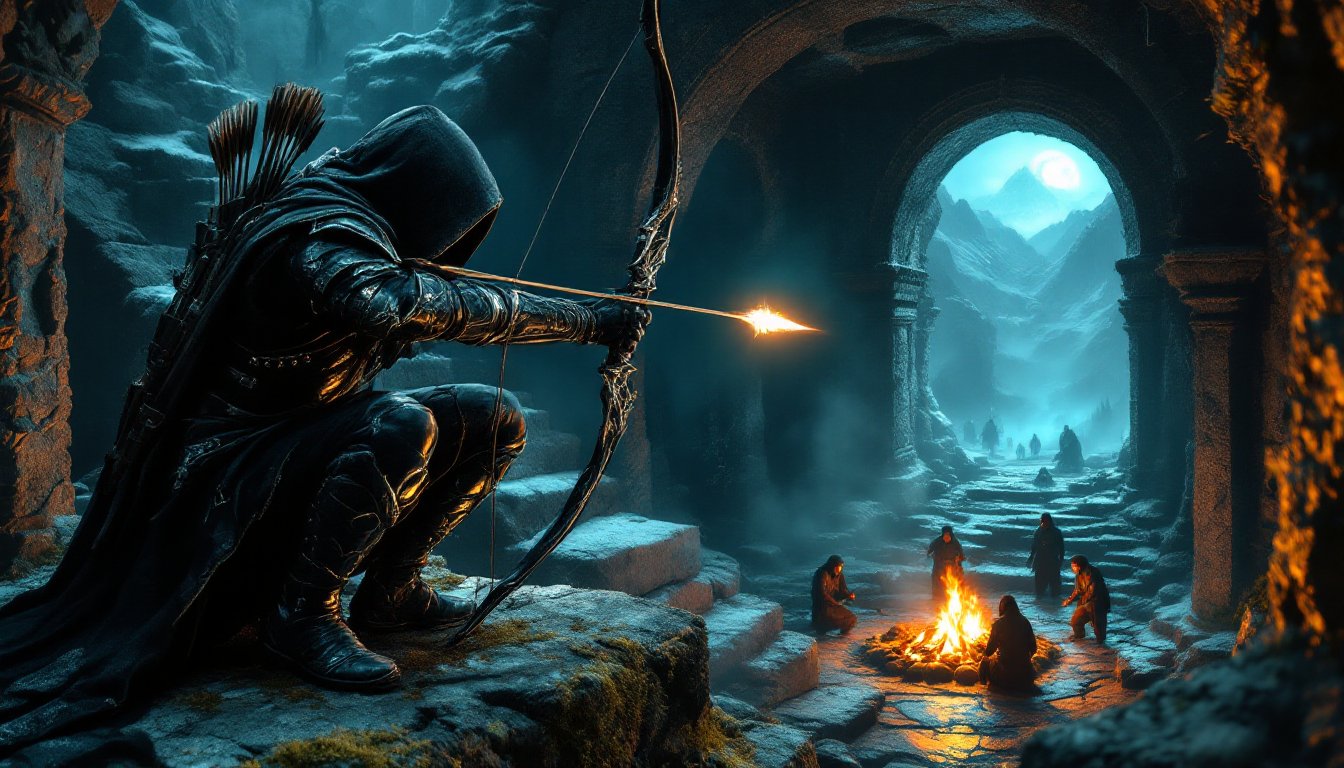
Falmer and Chaurus: Combat Strategies
Falmer are the primary enemy faction in Blackreach, and they’re significantly tougher than the ones you encounter in smaller caves. Expect Falmer Shadowmasters, Warmongers, and Gloomlurkers, all capable of wrecking you if you’re not careful.
Key tactics:
- Sneak archer heaven: Falmer are blind and rely on sound. If you’ve got a stealth build, this is your playground. Just don’t sprint or shout.
- Frost resistance: Many Falmer archers use frost-enchanted arrows. Stack resistance or chug potions.
- AoE spells: Falmer often cluster in camps. Fireball or Chain Lightning clears them fast.
- Watch for ambushes: Falmer love hiding around corners or dropping from above. Keep your camera moving.
Chaurus are the Falmer’s gross insect pets, and they’re everywhere. They spit frost damage from range and hit surprisingly hard in melee. Prioritize them first in group fights, they’re squishy but annoying.
Chaurus Reapers (introduced in Dawnguard) occasionally spawn and are significantly more dangerous. They’re fast, heavily armored, and deal poison damage. Use fire or shock spells to burst them down before they close distance.
Dwemer Automatons and How to Defeat Them
Blackreach is crawling with Dwemer machines, and they don’t care about your stealth archer fantasies.
Dwemer Spheres: Fast, mobile, and annoying. They roll toward you, pop up, and unleash melee or crossbow attacks. Shock damage staggers them effectively. If you’re melee, time your power attacks to interrupt their spin-up.
Dwemer Spiders: Weak individually but often swarm you. AoE or fast weapons handle them easily. They explode on death in later patches, so don’t stand too close.
Dwemer Centurions: The real threats. These hulking machines have massive health pools, heavy armor, and devastating steam breath attacks. Strategy:
- Target the chest core: When a Centurion opens its torso to vent steam, the glowing core takes extra damage.
- Keep distance: The steam breath deals continuous fire damage and staggers you. Kite backwards or use cover.
- Shock spells or enchantments: Dwemer automatons are weak to shock damage. A fully-charged Lightning Storm or shock-enchanted weapon shreds them.
- Paralysis cheese: Centurions are vulnerable to paralysis. If you’ve got the spell or enchanted weapon, you can stunlock them.
Don’t sleep on the loot. Players farming materials for Dwemer-related projects will find Centurions especially rewarding, dropping multiple Dwemer scrap pieces and occasionally Centurion Dynamo Cores.
Essential Loot and Unique Items to Collect
Crimson Nirnroot and the Return to Your Roots Quest
Blackreach is the only place in Skyrim where Crimson Nirnroot grows. These glowing red plants emit the same annoying hum as surface nirnroot but are significantly rarer.
You need 30 Crimson Nirnroot to complete “Return to Your Roots,” a miscellaneous quest you pick up by simply harvesting one. Turn them in to Avrusa Sarethi at Sarethi Farm (east of Riften), and you’ll receive The Nirnroot Missive plus Sinderion’s Serendipity, a permanent alchemy buff that gives you a 25% chance to craft duplicate potions.
There are exactly 44 Crimson Nirnroot plants in Blackreach, so you’ve got some wiggle room. They grow near water sources and along the cavern’s outer edges. The hum is audible from a decent range, so crank your volume and listen carefully. Collecting all 30 in one trip saves you from having to navigate this place multiple times.
Pro tip: Many players following comprehensive game guides mark nirnroot locations on their maps during exploration to streamline the grind.
Dwemer Artifacts and Valuable Resources
Blackreach is a Dwemer scrap paradise. You’ll find:
- Bent Dwemer scrap metal: Smelts into Dwarven Metal Ingots (3 pieces = 1 ingot).
- Large/Small Dwemer plate metal: Same deal, different ratios.
- Dwemer gears, cogs, and levers: Used in various crafting recipes and fetch quests.
- Centurion Dynamo Cores: Rare drops from Centurions, needed for Daedric smithing.
The sheer volume of scrap makes Blackreach one of the best farming zones for players leveling Smithing. Just be ready to manage your carry weight, this stuff is heavy.
Unique items worth grabbing:
- Aetherium Shards (if you have Dawnguard): One shard is located in Blackreach during “Lost to the Ages.”
- Notched Pickaxe: Found embedded in a rock near the exit of the Tower of Mzark. It’s a unique pickaxe with shock and stamina absorption enchantments, not amazing, but a cool trophy.
- Numerous soul gems: Dwemer shelves are loaded with filled petty and lesser soul gems. Stock up.
Chests scattered throughout the cavern contain leveled loot, so your haul quality depends on your level when you first enter.
Hidden Secrets and Easter Eggs
Summoning Vulthuryol: The Secret Dragon
Blackreach has a hidden dragon, and summoning it is one of Skyrim’s coolest secrets.
In the central cavern, you’ll see a massive glowing orb hanging from the ceiling. It’s called the Crimson Orb (or Centurion Sphere, depending on who you ask), and if you hit it with Unrelenting Force or any ranged attack, it chimes like a gong.
A few seconds later, Vulthuryol swoops down from the ceiling.
Vulthuryol is a unique named dragon that doesn’t appear anywhere else in the game. He’s roughly on par with a Blood Dragon in terms of difficulty, nothing crazy, but a fun surprise. The fight takes place in the open cavern, giving you plenty of room to maneuver. Kill him for a dragon soul and the usual dragon loot.
The orb is located roughly above the center of the main cavern, near the Tower of Mzark. Look up, you can’t miss it once you know it’s there.
Silent City and Other Hidden Locations
The Silent City is a partially submerged Dwemer ruin on the eastern side of Blackreach. It’s home to a Falmer Warmonger and a unique item called the Unknown Book, which is actually part of the “Unfathomable Depths” quest (unrelated to Blackreach but found here).
Other hidden spots:
Sinderion’s Field Laboratory: The body of Sinderion, a famous alchemist, lies in a small camp on the northern side of the cavern. Looting him starts the “Return to Your Roots” quest and provides some backstory for lore nerds.
Derelict Pumphouse: A small Dwemer structure with alchemy ingredients and minor loot. Easy to miss but worth checking.
Hall of Rumination: A Dwemer ruin accessible from within Blackreach that contains additional enemies and loot. It’s essentially a mini-dungeon within the larger zone.
If you’re exploring the broader narrative of the Dwemer civilization, Blackreach offers environmental storytelling that fleshes out their experiments with agriculture, constructs, and whatever bizarre research led to their disappearance.
Tips for Efficient Exploration and Survival
Recommended Levels and Builds
Blackreach scales with your level, but the enemies have a floor. Don’t attempt this zone below level 15 unless you enjoy pain.
Ideal builds:
Stealth archer: Obvious choice. Falmer can’t see, and there’s plenty of cover. Bring a strong bow and stack sneak perks.
Destruction mage: AoE spells dominate Falmer camps, and shock spells wreck Dwemer automatons. Mage armor perks compensate for the lack of physical defense.
Two-handed warrior: Dwemer machines are vulnerable to stagger from power attacks. Bring frost resistance and lots of healing potions.
Conjuration cheese: Summon atronachs or Dremora Lords and let them tank while you pick off stragglers. Works on everything.
Avoid pure illusion builds unless you’ve got the perks to affect Dwemer constructs (which you won’t until later levels). Pacify and Calm don’t work on machines.
Fast Travel and Navigation Shortcuts
You can’t fast travel while inside Blackreach. The game treats it as an interior cell. Your only options are:
- Activate the Great Lifts: Once you’ve unlocked a lift from below, you can use it to exit to the surface. The surface lift markers become fast travel points, letting you re-enter Blackreach without re-clearing the ruins.
- Mark and recall mods (PC only): If you’re on PC and using modding platforms, several mods add fast travel markers or recall spells for Blackreach.
- Clairvoyance spell: Cast this while tracking a quest objective (like “Elder Knowledge”), and it’ll show you the path. Helps when you’re lost.
Bring a follower if you’re worried about getting overwhelmed. Many players exploring alongside trusted companions find the zone much more manageable with an extra sword arm.
Quests That Take You Through Blackreach
Several quests intersect with Blackreach, though only one is mandatory:
Elder Knowledge (Main Quest): This is the big one. You’ll enter Blackreach during your search for the Elder Scroll, navigate to the Tower of Mzark, solve the puzzle, and retrieve the scroll. The quest doesn’t require you to explore the full cavern, just beeline to the tower if you’re in a hurry.
Discerning the Transmundane (Daedric Quest): Septimus Signus sends you to collect Dwemer artifacts and blood samples. While the quest technically starts in Alftand (the ruin leading to Blackreach), you’ll spend time in the zone gathering materials.
Return to Your Roots (Miscellaneous): Triggered by harvesting your first Crimson Nirnroot. Requires collecting 30 total.
Lost to the Ages (Dawnguard DLC): If you have Dawnguard installed, one of the four Aetherium Shards is located in Blackreach. You’ll need to grab it as part of the questline to forge Aetherium items.
No other named quests directly require Blackreach, but several radiant quests (Thieves Guild, Dark Brotherhood) can send you into the connected Dwemer ruins. These don’t technically take place in Blackreach itself but will drop you nearby.
For players diving deep into the history and mysteries of Skyrim’s underground, resources covering role-playing game world-building often highlight Blackreach as a standout example of environmental storytelling done right.
Conclusion
Blackreach is one of those rare locations that rewards curiosity. Most players see it once during the main quest, grab the Elder Scroll, and bail. But if you take the time to explore, really explore, you’ll find a secret dragon, a full alchemy quest, piles of valuable scrap, and some of the best environmental design in the game.
Is it worth the time investment? Absolutely, especially if you’re into Dwemer lore, completionist runs, or just farming resources for Smithing. The zone is large enough to feel epic but self-contained enough that you can clear it in a few focused sessions. Just bring plenty of potions, unlock those Great Lifts for easy re-entry, and don’t leave until you’ve grabbed all 30 crimson nirnroot. You’ll thank yourself later.